You are here
How to Improve Blood Flow in Your Hands and Arms
Originally published in July of 2015
 As a follow-up to a previous article on optimizing blood circulation in your lower extremities, this article serves to explain several physical steps that you can take to ensure healthy blood circulation in your arms and hands.
Before I get to some specific suggestions, here is a list of some of what you can accomplish by optimizing blood circulation in your upper extremities:
-
Prevent and overcome carpal tunnel syndrome.
-
Prevent and overcome golfer's elbow, tennis elbow, and other types of pain that can occur around your elbow joint.
-
Promote optimal temperature regulation in your upper extremities i.e. prevent having chronically cold hands.
-
Promote quick healing of wounds.
-
Promote healthy tissues -- including muscles, ligaments, and bones -- throughout your upper extremities.
Tracing Blood Circulation Through Your Arms and Hands
Please use your right hand to locate your left collar bone (clavicle). Let your fingers slip off the back surface of your left collar bone so that they enter the soft, fleshy groove that sits between your left collar bone and left "shawl" muscle (also called your trapezius muscle). Although I don't recommend that you do this, if you press down into this fleshy groove with enough force, you should be able to locate the upper surface of your first rib.
The space between your collar bone and your first rib on both sides of your body is important to blood circulation in your arms and hands, as the major blood vessels that travel to and from your arms and hands travel through this space.
Maintaining optimal space in this region is arguably the most important objective that you should focus on if you want to optimize blood circulation in your upper extremities.
You can maintain optimal space between your collar bones and first ribs by having good posture. Slouching forward diminishes this space by rotating your shoulder blades (scapulae) in a way that causes your collar bones to move closer to your first ribs.
Here are two key suggestions on how to consistently have good posture and prevent encroachment of the blood vessels that travel to and from your upper extremities:
-
Stretch your middle and upper spinal regions by lying on your back with a couple of pillows wedged up under your spine. Lying in this position for a few minutes at a time while you breathe regularly can provide an excellent stretch to your middle and upper back regions, which can help prevent habitual forward slouching by your back, shoulders, and chest.
You can accomplish this same stretch by lying back on a plastic exercise ball for a few minutes at a time. Be sure to maintain steady breathing, and be mindful of stretching for only as long as you can comfortably tolerate.
-
As simple as it might sound, just being consciously aware of your posture throughout the day is one of the best ways that you can promote good posture and good blood circulation to your arms and hands. If necessary, place reminders to maintain good posture throughout highly visible areas in your work and living spaces.
How To Use Acupressure To Promote Strong and Steady Blood Flow To Your Arms and Hands
Applying steady pressure for about 30 seconds at a time, up to several times per day, to acupressure points on your arms and hands that correspond with the largest and most accessible arteries in your upper extremities can significantly enhance blood circulation in these areas.
From your heart, oxygen and nutrient-rich blood travels to your upper extremities via your right and left subclavian arteries, which are major arteries that branch directly off of your aorta. "Subclavian" stands for sub-clavicle, or below your clavicle; your right and left subclavian arteries and their companion veins are the major blood vessels that travel through the space between your clavicles and first ribs.
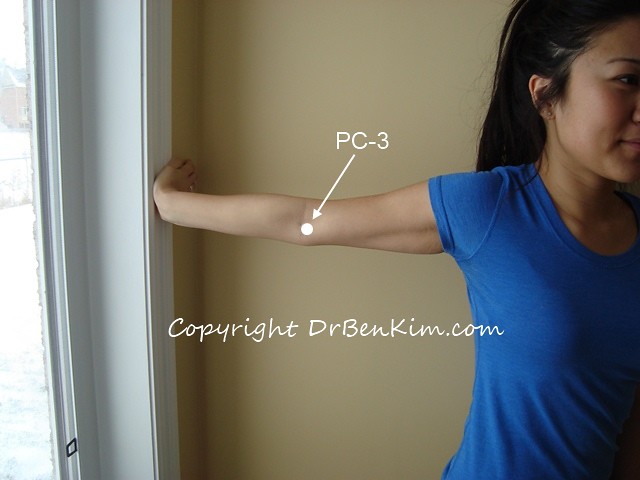
In your armpits, your subclavian arteries become your right and left axillary arteries, and along the length of your biceps muscles, your axillary arteries become your brachial arteries. In the soft, fleshy crease of each of your elbow joints, if you bend your arm slightly, you should be able to feel the tendon of your biceps muscle pop up. Just to the inside of your biceps tendon, about 1 finger-width above your elbow crease is where you can best access your brachial artery. This point is called Pericardium-3.
Pericardium-3 (PC-3)
PC-3 is best located and stimulated while your arm is relaxed and your elbow is bent. PC-3 corresponds with the last portion of your brachial artery, the artery that your doctor aims to listen to with his or her stethoscope when measuring your blood pressure. Pictures of PC-3 can be found on pages 36 and 38 of Acupressure's Potent Points.
***
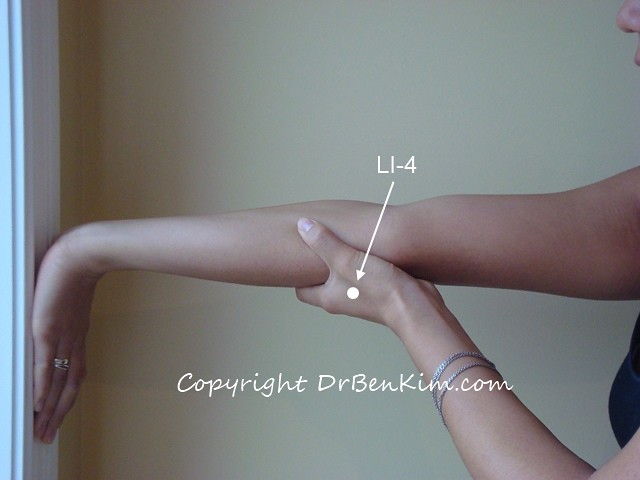
At your elbow crease, your brachial artery splits into your radial and ulnar arteries, which travel down your forearm toward your hand. In your wrist region, your radial and ulnar arteries split up into several smaller arteries that form a network of arteries that supply blood to your hand and fingers. The acupressure point that best enables you to access and stimulate this network of arteries is Large Intestine-4.
Large Intestine-4 (LI-4)
LI-4 is located in the soft, fleshy web that sits between your thumb and forefinger. This point allows access to stimulate the network small arteries that supply your hand and fingers via a superficial branch of your radial artery and another artery that supplies the base of your index finger. Pictures of LI-4 can be found on pages 40 and 41 of Acupressure's Potent Points.
***
Please note: As is the case for any self applications of acupressure, it's highly recommended that you consult with your primary health care provider before you stimulate the points listed above.
Beyond maintaining good posture and using acupressure, the dietary and lifestyle measures detailed in the following article can also help to promote optimal blood circulation in your arms and hands:
How to Prevent Diabetes Mellitus Type 2
A highly recommended, science-based reference book on using manual pressure (trigger point therapy) to address various physical ailments, including those related to poor blood circulation, is:
The Trigger Point Therapy Workbook: Your Self-Treatment Guide for Pain Relief, Second Edition


